Snoskred asked me to write tutorials on how to move a Blogger blog to a WordPress blog hosted on your own domain. So, I will write a tutorial for beginners. If you are advanced and know exactly what “FTP”, “MySQL”, “the database”, or “plugins are”, you don’t need this tutorial!
In contrast, true beginners need a multi-part series that explains everything from “step 1″. When I am done, it’s likely people will be able to follow the instructions and transfer their Blogger blog with less than four hours of effort. (And some of that time will be spent shopping for an appropriate host and domain name.)
Today, I’m going to describe preliminaries which include picking a hosting service and registering your domain name.
Preliminaries to Setting Up a WordPress Blog.
When you used Blogger, you didn’t need a hosting account and a domain. You also didn’t need to know what “FTP”. With WordPress will need these things.
That means you need to pick a host and establish a hosting account. I use Dreamhost’s crazy insane hosting, but there are many good hosts.
So, what do you do first?
- Research hosting plans. Ask at least three friends who have run a WordPress blog for at least 6 months to recommend a host. Ask them how much traffic they have, and if it’s similar to the amount of traffic you get, make sure they aren’t experiencing any load issues. Then, add that host to your list of candidate hosting accounts but don’t set up an account yet. Look up the price, and services for the hosting plans.
Also, learn what type of support that company has. (I like Dreamhost support, which is done through tickets and email. Some companies provide online chat, which is great if you are a beginner.)
- Pick a hosting account that permits you to run at least twoWorpdress blogs. This means you will need to be able to create at least two MySQL databases.
Why two WP installations? One will support your real blog; one will be a test blog. The test blog is optional, but it lets you check how an upgrade is going to work or test plugins are going to work before installing them on your real blog.
I mostly use my test blog when developing plugins. That skanky looking blog is here Test Blog.
- Pick a hosting plan that includes a web based FTP service.
Advanced users will scoff at this advice. They’ll say, “Come on, just use Unix!” True beginners are saying “What’s FTP?!?!” I’m guessing if you have been using Blogger, you don’t want to learn Unix just to run a WordPress blog- and you don’t have to.
 These days, nearly all web web hosts support a graphical FTP service that make uploading plugins as easy as uploading your images to Flicker. If you know nothing about “FTP” and are worried, just ask the sales department at a hosting company if they have their own web based FTP. If they do, using FTP will be as easy as uploading images to Flicker.
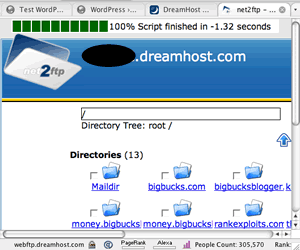
Dreamhost’sservice displays each of my domains as a “folder” or “directory”. I can click the directory links to see all the files and/or subdirectories in the folder, and I can upload by clicking “upload”. Load of other services are provided: zipping files, editing etc. It’s all very intuitive. (I also use Fetch for the Mac to upload and download files- it’s quicker, but doesn’t offer all the features Dreamhost provides. )
If they say they don’t have one, ask them to tell you how you would upload files to your hosting account (assuming you had one).
The sales representative (or your friend) may make several suggestions like “use Fetch” or “use FrontPage”. If you don’t understand what they are telling you, or their method involves buying expensive software, or learning Unix, remember: there are tons of hosts that have web based FTP. If you need that service, and you need the service, find a host who provides it.
- Select a hosting plan that provides easy installation for WordPress. Once again, advanced users will scoff. They will tell you that installing using FTP and a text editor is easy enough. Sure, sure. But clicking one button and letting a program someone else wrote create backups, perform file transfers and etc. is even easier. Many hosts use “Fantastico”; it’s very easy. Dreamhost has “one click installation” it’s even easier.
- Select the domain name you want. I registered (that is bought) “bigbucksblogger.com”.
Of course, first you need to pick a domain name and check if it’s available. Here’s one way to check: visit Domaintools.com, enter a domain name (say “absolutelyridiculousdomain.com”). Click. If the domain is taken, the service will tell you who owns it. If it’s not, you will get a result like this:
“Domain Status: Never Registered Before”.
If it’s not registered, you’ll be able to register it. But don’t do it yet!
You can register (buy) a domain name many places including your hosting company. In fact, many hosting services, including Dreamhost, provide one free domain name when you establish an account and permit you to buy more later. (I think I can buy additional domains for $9.95 through Dreamhost.)
So, if the hosting company you were interested in provides a free domain name, register this when you register for hosting!
You may also register domains with someone other than your hosting company. Still, for a complete beginners, it’s usually best to purchase your first domain through your hosting company because of the convenience.
Why? Because if you register your domain names through your host, they will point the DNS (Domain Name Server) correctly for you.
However, if you register through someone other than your host, you will need to figure out deal with your DNS yourself.
- Learn to point your DNS correctly. You only need to do this if you registered through someone other than your host! It’s easy to do.
Ask your host the address of the “name server” for your hosting plan. They’ll tell you. My host is Dreamhost, and my nameservers have names like: ns1.dreamhost.com etc. (Note: if you absolutely can’t figure out nameservers for your domain, you may need to do tomorrow’s lesson first. The reason is that, with some hosts, you can’t get the info you need to point the DNS servers until after you create a directory.)
Then, you visit your registrar (the company who sold you the domain name) and find the page that lets you change the DNS pointers. That page will look like the one shown below — but you will need to stick your host’s name servers in the boxes provided at your registrar’s site.
Because Dreamhost is both my host and my registrar, I control these all at the same account. Not only that, Dreamhost set these up for me in the first place. That’s the advantage of registering a domain through your hosting service.
So now what?
Once you’ve figured out where you want to host your service, what domain name you want and where you want to register your domain,
- Take out your credit card (or paypal account number.)
- Open a hosting account at the hosting service,
- Register your domain name and
- Point your DNS (if necessary.)
Then take a rest because you can’t do anything more for 24 hours. Your site will not be “live” until the DNS pointers do something called “resolving” and that takes time. No, you can’t even figure out if you screwed up your DNS pointers for 24 hours.
Just write a post at your Blogger blog, and wait.
-
This is a series: Part: I, Part: II , Part: III , Part: IV.
Great post.. I think it’s a GREAT idea for anyone who uses blogger to switch to wordpress. I love using wordpress and I think it makes it much easier to optimize and customize your website.
great post. im hoping you create a post on how to transfer a blogger blog a new owner. do you know how?
thanks.
[...] post assumes you have already 1) created a hosting plan, [...]
[...] to install WordPress on the web site you got up and running yesterday. (For earlier lessons click Getting a hosting plan and Creating your “website”. var AdBrite_Title_Color = ’0000FF’; var [...]
[...] Upgrading a Blogger Blog to WordPress for Beginners; Lesson I Upgrading a Blogger Blog to WordPress for Beginners; Lesson II How to Install WordPress: Upgrading a Blogger Blog to WordPress for Beginners, III Upgrading a Blogger Blog To WordPress, Lesson IV [...]
[...] is a series: Upgrading from Blogger to WordPress Part: I, Part: II , Part: III , Part: [...]